Recently when I set out to build a WPF application for one of the products my studio develops I decided to use the small Xaml framework called Caliburn.Micro to assist with wiring up the application and allow me to easily follow the MVVM pattern. The problem I faced was that the documentation was all over the place making it difficult to get a clear understanding of what the true capabilities of the framework were.
My goal for this tutorial is to go over some lessons I learnt while setting up the WPF application.
Project Details
For the purposes of this tutorial I will be building a new application called “So. Just Note It”. The project is a simple note taking application that I will be building on over time. I’m hoping to share some of my lessons and discoveries as the project develops.
Default Namespace: So.JustNoteIt.Client.Desktop
Description: WPF Application.
Assumptions
I am assuming you have knowledge on how to open a new project in Visual Studio as well as the ability program in, or at least understand, C#. I’m also assuming you have an understanding of NuGet, what it is, and how you work with it.
Ingredients
WPF Application
.Net Framework: 4.5
If you don’t already have a copy of Visual Studio installed, head on over to visualstudio.com and download yourself a copy.
Visual Studio Express 2013 RC for Windows Desktop was used during the writing of this article.
There isn’t anything covered within this tutorial that will restrict you to the use of Visual Studio 2013, so if you have an earlier version of Visual Studio, and it supports WPF development, go right ahead and use that. I chose to use the 2013 Express version for Windows Desktop to demonstrate you don’t need to have a high budget to start yourself off in developing for the Windows desktop using Microsoft’s tools.
External projects
The following projects are required for the purposes of this tutorial.
Caliburn.Micro
Project: http://caliburnmicro.codeplex.com/
Caliburn.Micro is a small framework designed for building applications across all Xaml Platforms. It supports MVVM and other proven UI patterns.
NuGet:
PM> Install-Package Caliburn.Micro
Method: Part A – Basic Caliburn.Micro configuration
In this first part of the method I will take you through what changes need to be made to a blank WPF application project in order to get Caliburn.Micro set up.
We are ready to get started with setting up our Visual Studio solution for our WPF application. If you haven’t already, go ahead and open Visual Studio and start a new WPF application project.
Install Caliburn.Micro
In the Package Manager Console window run the command to install the Caliburn.Micro NuGet package into your WPF application project.
PM> Install-Package Caliburn.Micro
Create folders for your Views and ViewModels
Create the following folders within the root of your WPF application project.
- ViewModels
- Views
Construct MainViewModel
Within your ~/ViewModels folder create a new class file and call it MainViewModel.cs.
Update the contents of the MainViewModel class to match the following code block.
namespace So.JustNoteIt.Client.Desktop.ViewModels
{
    public class MainViewModel : Caliburn.Micro.PropertyChangedBase
    {
        private const string WindowTitleDefault = "So. Just Note It";

        private string _windowTitle = WindowTitleDefault;

        public string WindowTitle
        {
            get { return _windowTitle; }
            set
            {
                _windowTitle = value;
                NotifyOfPropertyChange(() => WindowTitle);
            }
        }

    }
}
Configuring the application’s boot strapper
Create a new class file in the root of your project and call it AppBootstrapper.cs.
Update the contents of AppBootstrapper.cs to match the following code block. We will be adding the MainViewModel class later in the tutorial.
using Caliburn.Micro;
using So.JustNoteIt.Client.Desktop.ViewModels;

namespace So.JustNoteIt.Client.Desktop
{
    public class AppBootstrapper : Bootstrapper<MainViewModel>
    {
    }
}
Update the contents of App.xaml to match the following code block.
<Application x:Class="So.JustNoteIt.Client.Desktop.App"
             xmlns="http://schemas.microsoft.com/winfx/2006/xaml/presentation"
             xmlns:x="http://schemas.microsoft.com/winfx/2006/xaml"
             xmlns:local="clr-namespace:So.JustNoteIt.Client.Desktop"
             >
    <Application.Resources>
        <ResourceDictionary>
            <ResourceDictionary.MergedDictionaries>
                <ResourceDictionary>
                    <local:AppBootstrapper x:Key="bootstrapper" />
                </ResourceDictionary>
            </ResourceDictionary.MergedDictionaries>
        </ResourceDictionary>
    </Application.Resources>
</Application>
Set up the MainView
Within your ~/Views folder create a new Window (WPF) file and call it MainView.xaml.
Update the content of the MainView.xaml file to match the following code block.
<Window x:Class="So.JustNoteIt.Client.Desktop.Views.MainView"
        xmlns="http://schemas.microsoft.com/winfx/2006/xaml/presentation"
        xmlns:x="http://schemas.microsoft.com/winfx/2006/xaml"
        xmlns:mc="http://schemas.openxmlformats.org/markup-compatibility/2006"
        xmlns:model="clr-namespace:So.JustNoteIt.Client.Desktop.ViewModels"
        xmlns:d="http://schemas.microsoft.com/expression/blend/2008"
        mc:Ignorable="d"
        d:DataContext="{x:Type model:MainViewModel}"
        Title="{Binding WindowTitle}"
        Height="300" Width="300">
    <Grid>

    </Grid>
</Window>
Build and run your WPF application

The application’s Main Window with no additional views or content.
Congratulations! You have yourself the start of your very own WPF application using the Caliburn.Micro framework.
The next step is to start filling out your application. In part B of the method I will go over how Caliburn.Micro uses conventions to automatically wire your view model up with its view.
Before we move on with adding a view to the application I would like explain how the application is being pulled together so far.
Notes for Method: Part A
The Application Bootstrapper
The bootstrapper is the class that configures the framework, telling it what to do and where to start.
In the So.JustNoteIt.Desktop.Client project the bootstrapper class is AppBootstrapper. This bootstrapper class is configured to use the default Caliburn.Micro configuration, and load the MainViewModel as the first screen.
Caliburn.Micro knows to load this view model class as the main view model because it is the Type being passed into the Caliburn.Micro.Bootstrapper generic class.
public class AppBootstrapper : Bootstrapper
Telling Caliburn.Micro which bootstrapper class to use
Caliburn.Micro knows which bootstrapper class to user by looking for an application resource with the Key “bootstrapper”.
<local:AppBootstrapper x:Key="bootstrapper" />
Ensure App.xaml doesn’t try to load a specific start-up uri
I removed the StartupUri attribute from the Application node in ~/App.xaml. This is to ensure Caliburn.Micro has control over the view to be loaded first.
<Application x:Class="WpfApplication1.App"
             xmlns="http://schemas.microsoft.com/winfx/2006/xaml/presentation"
             xmlns:x="http://schemas.microsoft.com/winfx/2006/xaml"
             StartupUri="MainWindow.xaml">
    <Application.Resources>

    </Application.Resources>
</Application>
Design time assistance
To assist with verifying your bindings with the view’s view model I find it helps to specify the design time DataContext within the xaml.
<Window x:Class="So.JustNoteIt.Client.Desktop.Views.MainView"
        xmlns="http://schemas.microsoft.com/winfx/2006/xaml/presentation"
        xmlns:x="http://schemas.microsoft.com/winfx/2006/xaml"
        xmlns:mc="http://schemas.openxmlformats.org/markup-compatibility/2006"
        xmlns:model="clr-namespace:So.JustNoteIt.Client.Desktop.ViewModels"
        xmlns:d="http://schemas.microsoft.com/expression/blend/2008"
        mc:Ignorable="d"
        d:DataContext="{x:Type model:MainViewModel}"
        Title="{Binding WindowTitle}"
        Height="300" Width="300">
    <Grid>

    </Grid>
</Window>
Method: Part B – Adding a view and its view model
So we have the shell of our application set up and configured using Caliburn.Micro. Now what?
To demonstrate how easy it is to build your application with Caliburn.Micro I’m going to create a simple view that takes a user input, then displays it when a button is clicked. Additionally, I’m going to throw in there a check box that will allow you to enable/disable the button.
Journal View Model
First off we’ll create a JournalViewModel view model class within a ~/ViewModels/Journaling/ folder.
namespace So.JustNoteIt.Client.Desktop.ViewModels.Journaling
{
    public class JournalViewModel : Caliburn.Micro.PropertyChangedBase
    {
        private bool _canDisplayNote;
        private string _note = string.Empty;
        private string _noteDisplay = string.Empty;

        public JournalViewModel()
        {

        }

        ///
        /// Indicates whether or not the Note can be displayed.
        ///
        public bool CanDisplayNote
        {
            get { return _canDisplayNote; }
            set
            {
                _canDisplayNote = value;
                NotifyOfPropertyChange(() => CanDisplayNote);
            }
        }

        ///
        /// The Journal's Note.
        ///
        public string Note
        {
            get { return _note; }
            set
            {
                _note = value;
                NotifyOfPropertyChange(() => Note);
            }
        }

        ///
        /// The note to display.
        ///
        public string NoteDisplay
        {
            get { return _noteDisplay; }
            set
            {
                _noteDisplay = value;
                NotifyOfPropertyChange(() => NoteDisplay);
            }
        }

        ///
        /// Displays the note.
        ///
        public void DisplayNote()
        {
            NoteDisplay = Note;
        }
    }
}
Journal View
Next we’ll create a JournalView user control in a ~/Views/Journaling/ folder to act as the view for our JournalViewModel view model.
<UserControl x:Class="So.JustNoteIt.Client.Desktop.Views.Journaling.JournalView"
             xmlns="http://schemas.microsoft.com/winfx/2006/xaml/presentation"
             xmlns:x="http://schemas.microsoft.com/winfx/2006/xaml"
             xmlns:mc="http://schemas.openxmlformats.org/markup-compatibility/2006"
             xmlns:d="http://schemas.microsoft.com/expression/blend/2008"
             mc:Ignorable="d"
             d:DesignHeight="300" d:DesignWidth="300">
    <StackPanel>
        <Label Content="Note:" />
        <TextBox x:Name="Note" />
        <CheckBox x:Name="CanDisplayNote" Content="Can Dislpay Note" />
        <Button x:Name="DisplayNote" Content="Display Note" />
        <Label x:Name="NoteDisplay" />
    </StackPanel>
</UserControl>
Updated Main View Model
An instance of our JournalViewModel is then added to the MainWindowViewModel.
using So.JustNoteIt.Client.Desktop.ViewModels.Journaling;

namespace So.JustNoteIt.Client.Desktop.ViewModels
{
    public class MainViewModel : Caliburn.Micro.PropertyChangedBase
    {
        private const string WindowTitleDefault = "So. Just Note It";

        private JournalViewModel _journalView;
        private string _windowTitle = WindowTitleDefault;

        public MainViewModel()
        {
            JournalView = new JournalViewModel();
        }

        public JournalViewModel JournalView
        {
            get { return _journalView; }
            set
            {
                _journalView = value;
                NotifyOfPropertyChange(() => JournalView);
            }
        }

        public string WindowTitle
        {
            get { return _windowTitle; }
            set
            {
                _windowTitle = value;
                NotifyOfPropertyChange(() => WindowTitle);
            }
        }

    }
}
Update the Main View
Finally we are going to add a ContentControl for our JournalView in our MainWindowView.
<Window x:Class="So.JustNoteIt.Client.Desktop.Views.MainView"
        xmlns="http://schemas.microsoft.com/winfx/2006/xaml/presentation"
        xmlns:x="http://schemas.microsoft.com/winfx/2006/xaml"
        xmlns:mc="http://schemas.openxmlformats.org/markup-compatibility/2006"
        xmlns:model="clr-namespace:So.JustNoteIt.Client.Desktop.ViewModels"
        xmlns:d="http://schemas.microsoft.com/expression/blend/2008"
        mc:Ignorable="d"
        d:DataContext="{x:Type model:MainViewModel}"
        Title="{Binding WindowTitle}"
        Height="300" Width="300">
    <Grid>
        <ContentControl x:Name="JournalView" />
    </Grid>
</Window>
Build and run your WPF application
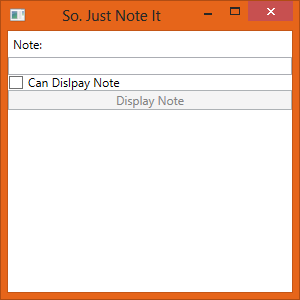
So. Just Note It with a simple view that takes a user input and displays it as a message.
Give it a go. Toggle the CheckBox and you’ll see that it enables/disables the button. Click the Button and whatever text you entered into the TextBox will be displayed in the Label, thanks to the DisplayNote method in our JournalViewModel.
Now that you have all the code you need to perform all the basic requirements of an application I’ll go through and explain how Caliburn.Micro wires up your views for you.
Notes for Method: Part B
A naming convention to locate the View for a ViewModel
Caliburn.Micro uses naming conventions for locating the Views of any ViewModels within your application. For example, with our So.JustNoteIt.Client.Desktop.ViewModels.MainViewModel it looks for a View called So.JustNoteIt.Client.Desktop.ViewModels.MainViewModel.
Out of the box Caliburn.Micro treats the folder ~/ViewModels as the root folder for all your ViewModels and ~/Views the root folder for your Views. As long as your ViewModel’s View is located in the same relative folder and namespace as your ViewModel’s relation to the ViewModels root folder Caliburn.Micro should be able to locate your view.
In the “So.JustNoteIt.Client.Desktop” project the folder/namespace structure is as follows, and Caliburn.Micro finds the views for all the ViewModels without any custom configuration:
- So.JustNoteIt.Client.Desktop
- ViewModels
- Journaling
- JournalViewModel.cs
- MainViewModel.cs
- Journaling
- Views
- Journaling
- JournalView.xaml
- MainView.xaml
- Journaling
- ViewModels
If none of the conventions that come out of the box for locating the views doesn’t work in with the way you wish your project to be structured there is also the ability to configure your own conventions. As to the how that can be done, it is out of the scope of this tutorial.
Binding and action conventions
In most cases Caliburn.Micro will attempt to use conventions to bind properties and methods within your ViewModel to controls within your View. The conventions are based on x:Name.
Caliburn.Micro will automatically try and bind the control you have given an x:Name to a property or method within the ViewModel of the same name.
For our View, Caliburn.Micro is binding our DisplayNote button’s click event to the DisplayNote method within our ViewModel, the TextBox Note to the Note property and I think you get the picture.
But this doesn’t explain how toggling the CanDisplayNote Checkbox enables/disables the DisplayNote button.
Simple “Can” prefix on a property guards access to methods
Out of the box Caliburn.Micro will use any method or property that returns a bool and is a button’s name prefixed with “Can” to enable/disable the button. This is how toggling the CanDislpayNote enables/disables the DisplayNote button.
PropertyChangedBase
Because binding rely’s on a PropertyChanged event being raised to work, and to help with easing re-factoring, Caliburn.Micro includes a very handy base class called PropertyChangedBase. Within the PropertyChangedBase class there is a method called NotifyOfPropertyChanged that takes an expression allowing you to specify the property that is changing. You don’t have to use string constants to notify of property changes.
In Closing
So far we’ve gone over the basics of how to configure your WPF application to use Caliburn.Micro. Hopefully you see how easy it is to pull your application together using the framework. From here you should be able to focus less on the wiring and more on your application structure, the part only you can write.
Resources
Caliburn.Micro Introduction: The introduction is a good place to start. Here you’ll find a brief description of the main components within the framework.
Caliburn.Micro NuGet Package Installation: A very simple walk-through on how to install the framework into various types of Xaml applications using the NuGet package installer within Visual Studio.
Caliburn.Micro Basic Configuration: Caliburn.Micro documentation on configuring an WPF Application to use the framework.
Caliburn.Micro Cheat Sheet: This cheat sheet covers some of the basic conventions within the framework as well as some additional tools it supplies for scenarios that fall outside what the conventions cover.
Hi,
I’m new to caliburn micro and i was trying your example.
I’m using VS2013 and i just installed caliburn micro.
When i create the AppBootstrapper class like you said i get an error which says-
Error 1 The type or namespace name ‘Bootstrapper’ could not be found (are you missing a using directive or an assembly reference?)
this is my code which is exactly like yours but with the red squigly line under Bootstrapper 🙁
using System;
using System.Collections.Generic;
using System.Linq;
using System.Text;
using System.Threading.Tasks;
using Caliburn.Micro;
using So.JustNoteIt.Client.Desktop.ViewModels;
namespace So.JustNoteIt.Client.Desktop
{
public class AppBootstrapper : Bootstrapper
{
}
}
What is wrong???
I discovered the same issue when I started a new Windows Universal app (for Windows RT and Windows Phone 8.1). The following article on the3 Caliburn.Micro website best describes the situation and solution:
http://caliburnmicro.com/documentation/windows-runtime
To summarise the article, the version of Caliburn.Micro compiled for Windows RT and Windows Phone 8.1 doesn’t use the Bootstrapper, instead it uses CaliburnApplication. In your App.xaml replace the Application instance with CaliburnApplication and you should be set.
I hope this helps.
Happy coding!
The class Bootstrapper is obsolete.
You have to use BootstrapperBase instead.
The following code will work:
using System.Windows;

using Caliburn.Micro;

using So.JustNoteIt.Client.Desktop.ViewModels;
namespace So.JustNoteIt.Client.Desktop
{
class AppBootstrapper : BootstrapperBase
{
public AppBootstrapper()
{
Initialize();
}
protected override void OnStartup(object sender, StartupEventArgs e)
{
DisplayRootViewFor();
}
}
}
I realize this is almost a year later, but I was able to sort this out.
Using Visual Studio 2013, I was getting problems where it couldn’t find my MainViewModel, and I was also getting the Bootstrapper problem you encountered.
To fix the MainViewModel problem:
I renamed my root project folder from So.JustNoteIt to So.JustNoteIt.Client.Desktop, it was then able to find everything.
To fix the BootStrapper problem:
I changed my code to the following:
public class AppBootstrapper : Caliburn.Micro.BootstrapperBase

    {

        public AppBootstrapper()

        {

            Initialize();

        }
protected override void OnStartup(object sender, StartupEventArgs e)
{
DisplayRootViewFor();
}
}
This fixed all the problems I was having and I was able to compile and run the code at that point.
Thanks, this was a really helpful first introduction to Caliburn.Micro
very good post, TNX